Battery switch on travel trailer function is crucial for managing your RV’s power. Understanding how these switches work—whether it’s a simple on/off or a more sophisticated system—is key to preventing dead batteries and maximizing your off-grid adventures. This guide breaks down the different types of switches, their wiring, troubleshooting tips, and safety precautions to keep your travel trailer running smoothly.
We’ll cover everything from basic setups to more complex systems involving solar panels and charging systems, providing clear explanations and diagrams to help you understand the intricacies of your travel trailer’s electrical system. Learn how to diagnose problems, perform maintenance, and even install or replace a battery switch if needed.
Types of Battery Switches in Travel Trailers
Choosing the right battery switch for your travel trailer is crucial for managing your power sources effectively and preventing accidental drain. Different switches offer varying levels of control and protection. Understanding their features and limitations will help you make an informed decision.
Travel trailers typically use either 12-volt batteries (for house functions) and sometimes a separate battery for the starting system of the tow vehicle. Proper management of these batteries is vital, especially for extended camping trips. Battery switches facilitate this control, allowing you to isolate, combine, or disconnect batteries as needed.
Battery Switch Types, Battery switch on travel trailer function
Several types of battery switches are commonly used in travel trailers, each with its own set of advantages and disadvantages. Let’s explore the most prevalent options.
Planning your next big adventure? Protecting yourself is key, and that starts with travel insurance. A good option to consider is aon travel insurance , especially if you’re headed somewhere a little off the beaten path. They offer solid coverage for a range of activities. For a more relaxed trip, aon travel insurance might be a better fit; they have plans tailored to different needs and budgets.
Browse their options and find the perfect fit for your upcoming trip.
| Switch Type | Description | Advantages | Disadvantages |
|---|---|---|---|
| 1-2-Both Switch | This switch allows you to select between using the chassis battery (usually for starting the tow vehicle), the house battery (powering the trailer’s interior systems), or both simultaneously. | Simple operation, provides clear control over battery usage. Allows charging both batteries from the tow vehicle alternator or a shore power converter. | Can be prone to accidental switching if not clearly labeled. Doesn’t offer complete isolation of batteries. |
| Disconnect Switch | A simple on/off switch that completely isolates the house battery from the rest of the trailer’s electrical system. | Provides complete battery isolation, preventing parasitic drain when the trailer is not in use. Essential for long-term storage. | Limited functionality; you cannot select different battery sources. Requires manually switching the battery on and off. |
| Combination Switches (with fuses/circuit breakers) | These switches often combine a 1-2-Both switch with individual fuses or circuit breakers for each battery, providing both selection and overload protection. | Offers both selection and protection. More robust than a simple 1-2-Both switch. | More complex to install and potentially more expensive. |
| Remote Battery Switches | These switches allow you to control the battery connections from a convenient location inside the trailer, often near the control panel. | Improved accessibility and convenience, especially for batteries located in less accessible areas. | Can be more expensive and require additional wiring. Potential for failure of the remote control mechanism. |
Function and Purpose of Battery Switches: Battery Switch On Travel Trailer Function
A battery switch in your travel trailer acts as the central control for your trailer’s power system, allowing you to manage the flow of electricity between your various power sources and your house battery. This is crucial for maintaining the health of your battery and preventing unexpected drain, especially when your trailer is stored for extended periods.The primary function of a battery switch is to isolate the house battery from the rest of the electrical system.
This is vital for preventing parasitic drain, a slow but constant depletion of your battery’s charge caused by small electrical draws from devices like clocks, carbon monoxide detectors, or even the battery’s own internal systems. Leaving these devices connected to a constantly drained battery can lead to a dead battery and the need for a jump-start, or worse, costly battery replacement.
So, you’re planning a trip? Awesome! Don’t forget travel insurance! Check out Aon travel insurance for comprehensive coverage. They’ve got you covered for medical emergencies and more. If you’re looking for another option, Aon travel insurance also offers a range of plans, so compare and choose the best fit for your adventure.
Seriously, don’t skip this step; it’s peace of mind worth its weight in gold!
The battery switch allows you to completely disconnect the house battery when not in use, effectively halting this parasitic drain.
Preventing Parasitic Drain on the House Battery
A parasitic drain, even a small one, can significantly impact your battery’s lifespan and readiness for use. Imagine a small LED light drawing only 0.1 amps; over a month of inactivity, this seemingly insignificant drain can completely deplete a typical RV battery. A battery switch provides a simple, effective solution: by switching the house battery to the “off” position, you interrupt the circuit, preventing any current flow to the connected devices.
So, you’re planning a trip? Awesome! Don’t forget travel insurance! Check out aon travel insurance for comprehensive coverage. They’ve got options for everything from lost luggage to medical emergencies. And if you need something a bit more adventurous, aon travel insurance also offers specialized plans for thrill-seekers, making sure you’re covered no matter where your travels take you.
Get a quote today and travel worry-free!
This ensures your house battery remains fully charged when your travel trailer is not in use. Regularly switching the battery to the “off” position is a simple preventative measure that significantly extends battery life and saves you the inconvenience and cost of a dead battery.
Managing Power from the Tow Vehicle and Solar Panels
The battery switch also plays a crucial role in managing power from external sources like your tow vehicle’s charging system and solar panels. Many battery switches offer multiple positions, allowing you to select which power source charges the house battery. For instance, you might use the “tow” position to charge the battery while driving, and the “solar” position to charge it using your solar panels when parked.
This allows for flexible and efficient charging, ensuring your house battery is always ready for use. The ability to selectively engage different power sources maximizes your battery’s lifespan and keeps your trailer ready for off-grid adventures.
Wiring Diagrams and Schematics

Understanding how your battery switch integrates with the rest of your travel trailer’s electrical system is crucial for safe and reliable operation. Wiring diagrams provide a visual representation of these connections, making troubleshooting and maintenance much easier. Let’s explore some common configurations.
Simplified Battery Switch Wiring Diagram
This diagram illustrates a basic setup with a single battery and a battery switch. The switch acts as an on/off control for the house battery, isolating it from the trailer’s electrical system when not in use.
A simple diagram would show a battery (labeled “House Battery”), connected to a battery switch (labeled “Battery Switch”). From the switch, two wires lead to the trailer’s 12V distribution panel (labeled “12V Panel”). One wire is the positive (+) connection, and the other is the negative (-) connection. The negative connection often goes directly to the chassis ground. A ground wire also connects directly from the battery to the chassis.
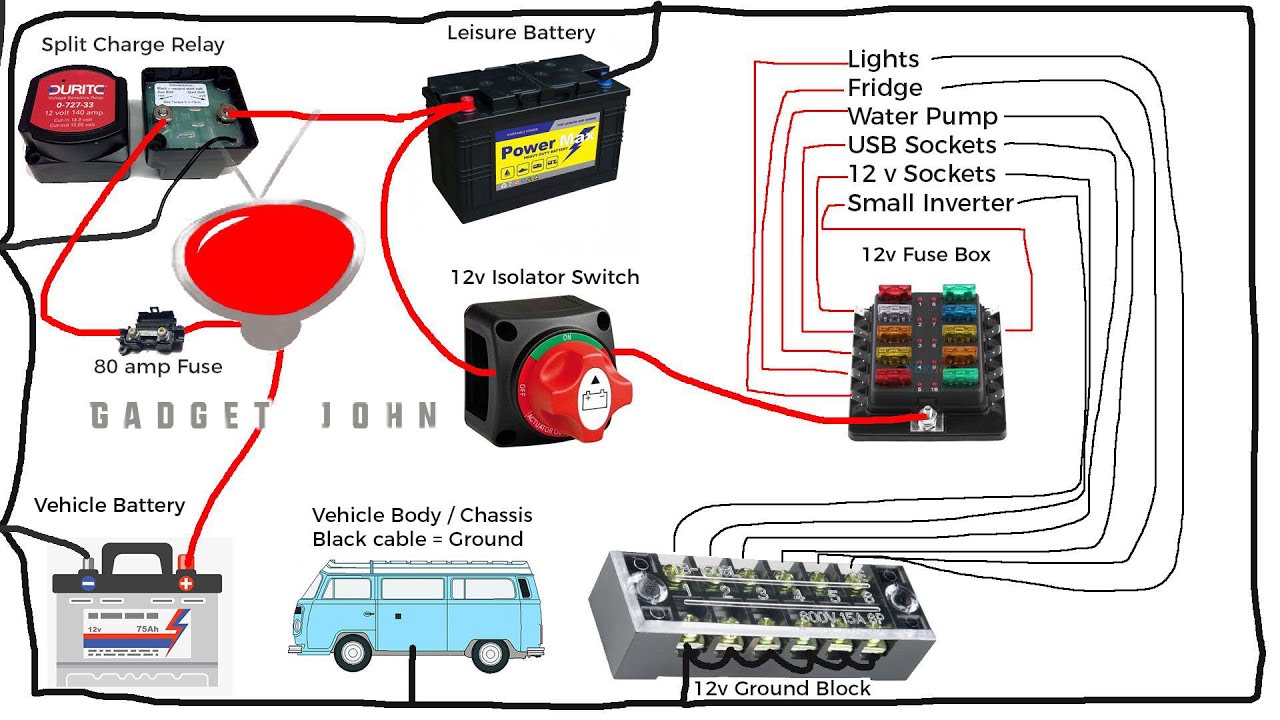
Complex Battery Switch Wiring Diagram with Solar and Charging System
This more advanced diagram incorporates solar panels and a charging system, showcasing how the battery switch interacts with multiple power sources. This setup allows for charging the battery from shore power, solar panels, and potentially an alternator.
This diagram shows a more complex system. In addition to the House Battery and Battery Switch, it includes solar panels (labeled “Solar Panels”) connected to a solar charge controller (labeled “Solar Charge Controller”). The solar charge controller is then connected to the battery. A shore power connection (labeled “Shore Power”) is also connected to a converter/charger (labeled “Converter/Charger”), which also connects to the battery. All positive connections converge at the battery switch before reaching the 12V panel. Negative connections are grounded similarly to the simpler diagram. A fuse or circuit breaker should protect each circuit.
Different Wiring Configurations
> Configuration A: Basic setup – This involves a single battery, a battery switch, and the 12V panel. It’s the simplest configuration and suitable for trailers with minimal power needs. This mirrors the simplified diagram above.> Configuration B: Solar integration – This adds solar panels and a solar charge controller to the basic setup. The solar charge controller regulates the power from the solar panels and prevents overcharging the battery. This configuration is shown in the complex diagram above.> Configuration C: Dual Battery Setup – This configuration involves two batteries (e.g., a house battery and a starting battery), each with its own connection to the battery switch. The switch allows for independent control of each battery. This would require additional wiring and a more complex switch. It would add a second battery (labeled “Starting Battery”) with its own positive and negative connections to the switch, and would require the switch to have more positions.> Configuration D: Generator Integration – This expands upon previous configurations by adding a generator (labeled “Generator”) to the system. The generator output would typically connect to the converter/charger, providing another charging source for the battery. This adds another power source to the complex diagram above.
Troubleshooting Common Issues
Dealing with a malfunctioning battery switch in your travel trailer can be frustrating, but systematic troubleshooting can often pinpoint the problem quickly. Understanding the common causes of failure and how to diagnose them will save you time and potential headaches down the road. This section will guide you through the process of identifying and resolving these issues.Troubleshooting a faulty battery switch involves a methodical approach, starting with the simplest checks and progressing to more involved diagnostics.
Remember safety first – always disconnect the battery’s negative terminal before working on any electrical components.
Identifying Common Problems
Common problems with battery switches stem from two main culprits: corrosion and loose connections. Corrosion builds up over time due to exposure to the elements and can significantly impede electrical conductivity. Loose connections, often caused by vibration during travel, can interrupt the flow of current and lead to inconsistent power. Visual inspection is your first line of defense.
Look closely at the switch terminals and wiring for any signs of green or white powdery deposits (corrosion) or loose wires. You might also notice discoloration or burning around the terminals, indicating a high-resistance connection or excessive current flow.
Diagnosing a Faulty Battery Switch
A step-by-step approach is crucial for effective diagnosis. This ensures you check the most likely causes first, saving time and effort.
- Visual Inspection: Carefully examine the battery switch itself, looking for signs of corrosion on the terminals or loose connections. Pay close attention to the wiring leading to and from the switch; check for any breaks, fraying, or damage. A corroded terminal will appear dull, green, or white, and might even be visibly pitted. A loose connection might show signs of wear or discoloration around the terminal.
- Voltage Testing: Using a multimeter, check the voltage at the battery terminals and at the output terminals of the switch. If the voltage at the output is significantly lower than at the battery, there’s a problem with the switch or its connections. For instance, a 12V battery should show approximately 12V at the terminals. If you measure only 10V at the switch’s output, you have a voltage drop indicating a problem.
- Continuity Testing: With the switch in the “on” position, use a multimeter to check for continuity between the input and output terminals. If there’s no continuity, the switch itself is faulty. Continuity testing verifies that the electrical path is complete and unobstructed. A multimeter should beep or show a low resistance reading if continuity is present.
- Checking Wiring: Trace the wiring from the battery to the switch and from the switch to the load (e.g., your trailer’s appliances). Look for any breaks, loose connections, or areas of damage along the entire wire path. Pay particular attention to the connection points – these are common failure points. A broken wire will be obvious, while a loose connection might be slightly more challenging to spot.
Troubleshooting Guide
This guide summarizes the diagnostic steps and suggests solutions for each potential issue.
- Problem: Corrosion on terminals. Solution: Clean the terminals with a wire brush and baking soda solution. Apply a corrosion inhibitor to prevent future buildup.
- Problem: Loose connections. Solution: Tighten all connections securely. Consider using wire nuts or crimp connectors for improved reliability.
- Problem: Faulty switch. Solution: Replace the battery switch with a new one of the same type and amperage rating.
- Problem: Broken or damaged wiring. Solution: Repair or replace the damaged wiring. Use appropriately sized wire and secure all connections properly. If extensive repair is needed, it might be wise to consult a qualified RV technician.
Mastering your travel trailer’s battery switch is a game-changer for extending your off-grid capabilities and preventing frustrating power outages. By understanding the different switch types, their functions, and potential issues, you can confidently manage your RV’s power, ensuring smooth and enjoyable trips. Remember to prioritize safety when working with electrical systems and consult a professional if you’re unsure about any aspect of the process.
Happy travels!
FAQ Guide
What happens if my battery switch is left in the “off” position?
Leaving the switch off completely disconnects your house batteries from the rest of the trailer’s electrical system, preventing any power drain, even when parked for extended periods. However, it also means you won’t have any power to appliances or lights.
How often should I check my battery switch connections?
Inspect your battery switch connections at least twice a year, or more frequently if you notice any unusual electrical behavior. Look for corrosion, loose wires, or any signs of damage.
Can I use a battery switch with a lithium battery?
While you
-can* use a battery switch with a lithium battery, some lithium battery systems have built-in protection and may not require a separate switch. Check your battery’s manual for specific instructions.
My battery switch is stuck. What should I do?
Try using a penetrating lubricant on the switch mechanism. If that doesn’t work, you may need to replace the switch. Avoid forcing it, as you could damage the switch or surrounding components.
